cms1
This is an old revision of the document!
Overview
Setting up LAMP (Linux, Apache, MySQL & PHP)
- If you have Debian OS installed in your system, add the following line to /etc/apt/sources.list and put # before all existing lines in the file
deb http://ftp.us.debian.org/debian testing main contrib non-free
- Update package sources & safe upgrade your server
apt-get update
(This is safer than apt-get upgrade or apt-get dist-upgrade, because it safely upgrades your server and resolves dependencies)
- Install Apache2 and PHP5
apt-get install apache2 php5 libapache2-mod-php5 php5-gd
chmod -R 777 /var/www
Check if apache is working
/etc/init.d/apache2 restart
nano /var/www/info.php
Copy & paste the folowing php code in the nano editor
<?php
phpinfo();
?>
Go and check http://localhost/info.php in your browser to see configuration of installed php version.
- Install Mysql and PHPmyadmin
apt-get install mysql-server mysql-client php5-mysql
apt-get install phpmyadmin
When prompted for a password enter hello.
- Creating a MySQL DB & user for your Drupal installation
mysqladmin -u root -p create d7
Enter hello when you are prompted for password. If you get a “Database exists” error, please issue “mysqladmin -u root -p drop d7” to delete the existing database and then issue the create command.
- Configuring Apache for Clean URLs
a2enmod rewrite
/etc/init.d/apache2 restart
chmod -R 777 /var/www
Install Drupal
- Download http://ftp.drupal.org/files/projects/drupal-7.2.tar.gz or the latest stable version from http://drupal.org/project/drupal
- Prepare server for drupal setup
- Copy the drupal-7.2.tar.gz file to /var/www and uncompress the files so that you get /var/www/drupal-7.2 finally
- Rename the drupal-7.2 to d7
- Goto d7/sites/default, create a folder called files so that you have d7/sites/default/files
- Copy default.settings.php as settings.php so that you have d7/sites/default/settings.php
- Give 777 permissions to file(apply permissions to enclosed files) & settings.php
- Install drupal
- Goto http://localhost/d7
- Choose Standard installation profile and save and continue
- Leave English as is and save and continue
- Give Database Name as d7, Database username as root & Database password as hello for LAMP or leave blank for XAMPP and Save and continue
- configure Site information
- Site Name your full name
- Site e-mail address your email id
- configure Site maintenance account
- username as admin
- password & Confirm password as hello
- configure Server settings
- Choose India under Default country
- Choose Asia/Kolkata: Tuesday, June 21, 2011 - 14:51 +0530 under Default time zone and Save and continue
- Now click on Visit your new site
Bluemasters theme
Downloading Bluemasters theme
- Download http://ftp.drupal.org/files/projects/bluemasters-7.x-1.1.tar.gz into d7/sites/all/themes
- extract bluemasters-7.x-1.1.tar.gz so that you have d7/sites/all/themes/bluemasters
Installing Bluemasters theme
- Click on Appearence in the top black menu
- Click on Enable and set default near the bluemasters theme
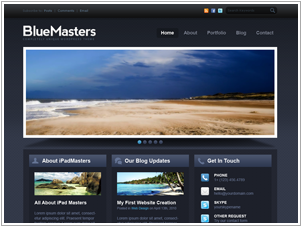
- Then close the Appearence window


Menus
Adding content
- Click on add content in top black menu
- Then click on Basic page
- Give Title as Workshop
- Write a summary about workshop in the body
- Check the box Provide a menu link under Menu Settings below Text format group
- Give Workshop in Menu link title
- Ensure <Main menu> under Parent item
- Choose 1 as Weight and click save
Similarly create pages about Prepare your computer, Software carpentry & CMS but ensure Workshop under Parent item for the new pages
Configuring Drop down menus
- Click on Structure in the top black menu and then click menus
- Then click list links near Main menu
- Then click edit near Workshop
- Check the box Show as expanded and then save
Slideshow
Prepare Images & Content
- Download some large images and resize them 930×320 resolution
- Place the images under d7/sites/default/files like d7/sites/default/files/slideshow-image-1.jpg
Edit page--front.tpl.php
- Open d7/sites/all/themes/bluemasters/page–front.tpl.php in gedit text editor
- Edit the file as following
  <div id="banner">
  <?php print render($page['banner']); ?>

      <div class="main_view">
          <div class="window">
              <div class="image_reel">
                  ...
                  ADD IMAGES HERE
                  ...
              </div>
              <div class="descriptions">
                  ...
                  ADD IMAGE DESCRIPTIONS HERE
                  ...
              </div>
          </div>

          <div class="paging">
              ...
              ADD IMAGE NUMBERS HERE
              ...
          </div>
      </div>
  </div><!--EOF:banner-->
- Add a image using the following syntax
<a href="<?php print url('node/1'); ?>"><img src="<?php print base_path() . 'sites/default/files/slide-image-1.jpg'; ?>"></a>
- node/1 is the url of the page which will be linked to the image
- sites/default/files/slide-image-1.jpg is the path to the image
- Add a image description using the following syntax
<div class="desc" style="display: none;">About Bluemasters</div>
- About Bluemasters is the image description which will appear on the image in the slideshow
- Add a Image number using the following syntax
<a rel="1" href="#">1</a>
- Based on the number of images, change value of rel attribute appropriately to maintain a numeric sequence
Blocks
Creating blocks
Normal blocks
- Click on Structure in the top black menu & then click Blocks
- Then click Add block
- Configure block
- About Workshop in Block description & Block title
- Write a summary about workshop in Block body
- Then Save block
Blocks with Images
- Follow the previous mentioned steps to create a block except Block body
- Download a image, rename it to block.jpg and copy it to d7/sites/default/files
- Put the following content in Block body to put image
<img src='/d7/sites/default/files/block.jpg' height=86 width=249>
- Select Full HTML under Text format
- Then Save block
Home page
- Click on Structure in the top black menu & then click Blocks
- Search for About Workshop Block and change the Region to Home area 1
- Then Save blocks
- Similarly create two more blocks and place it under Home area 2 && Home area 3
Other pages
- Create another block and place it under Sidebar first region to show it on pages other than home
Contact form
- Goto Modules in top black menu and search for contact
- Check the box in the Enabled column near contact
- Scroll down & Save configuration
- Goto Structure > Menus in top black menu
- Click List links near Main menu
- Click Add link
- Configure the menu item
- Contact us as Menu link title
- contact as Path and Save
Search
- Goto Configuration in top black menu
- Click Search settings under Search & Metadata
- If Indexing status is 0% click on cron maintenance task link at the top
- Then click on Run cron link appearing in the middle of the page
- Then goback to Indexing status and ensure 100%
cms1.1309007271.txt.gz · Last modified: 2018/03/24 11:13 (external edit)
Except where otherwise noted, content on this wiki is licensed under the following license: CC Attribution-Noncommercial-Share Alike 4.0 International
